Formulas 2.0: How to use Notion’s new and improved formulas with your existing setups
If you’ve used Notion’s formulas in the past, you may be wondering “what’s changed?” This guide breaks down what’s new and what that means for you as a formulas power user.
- What's new with formulas
- What that means for you
- Update formulas to get rich data outputs
- Call workspace level information from properties
- Create your own variables with let
- Reference properties in related databases (without rollups!)
- Explore all changes to existing functionality
What's new with formulas
We improved the formulas experience so that: (1) it’s easier to write formulas, (2) formula outputs include more property types, and (3) the formula language can fulfill more specific needs.

What about my existing formulas?
In this guide, we’ll look at what’s new with formulas, and talk about what that means for current formula users. If you’re new to formulas entirely, consider checking out our beginner guide on how to write Notion formulas that extend the capabilities of your databases.
Here’s what’s new with formulas 2.0:
Writing and editing formulas is easier — Formulas can be written multi-line in the editor (with tabs and comments too!), and errors are more actionable. When you write formulas, you’ll see an expanded editor box that supports multi-line editing – making it easier to view and edit long formulas. Plus, we now type-check and highlight errors directly in the editor box, so you can easily fix your syntax and ensure your formulas work.
Formulas now support rich data outputs — previously, formulas only supported text, numeric, and checkbox (boolean) outputs. Now, they also support displaying pages, dates, people, and lists.
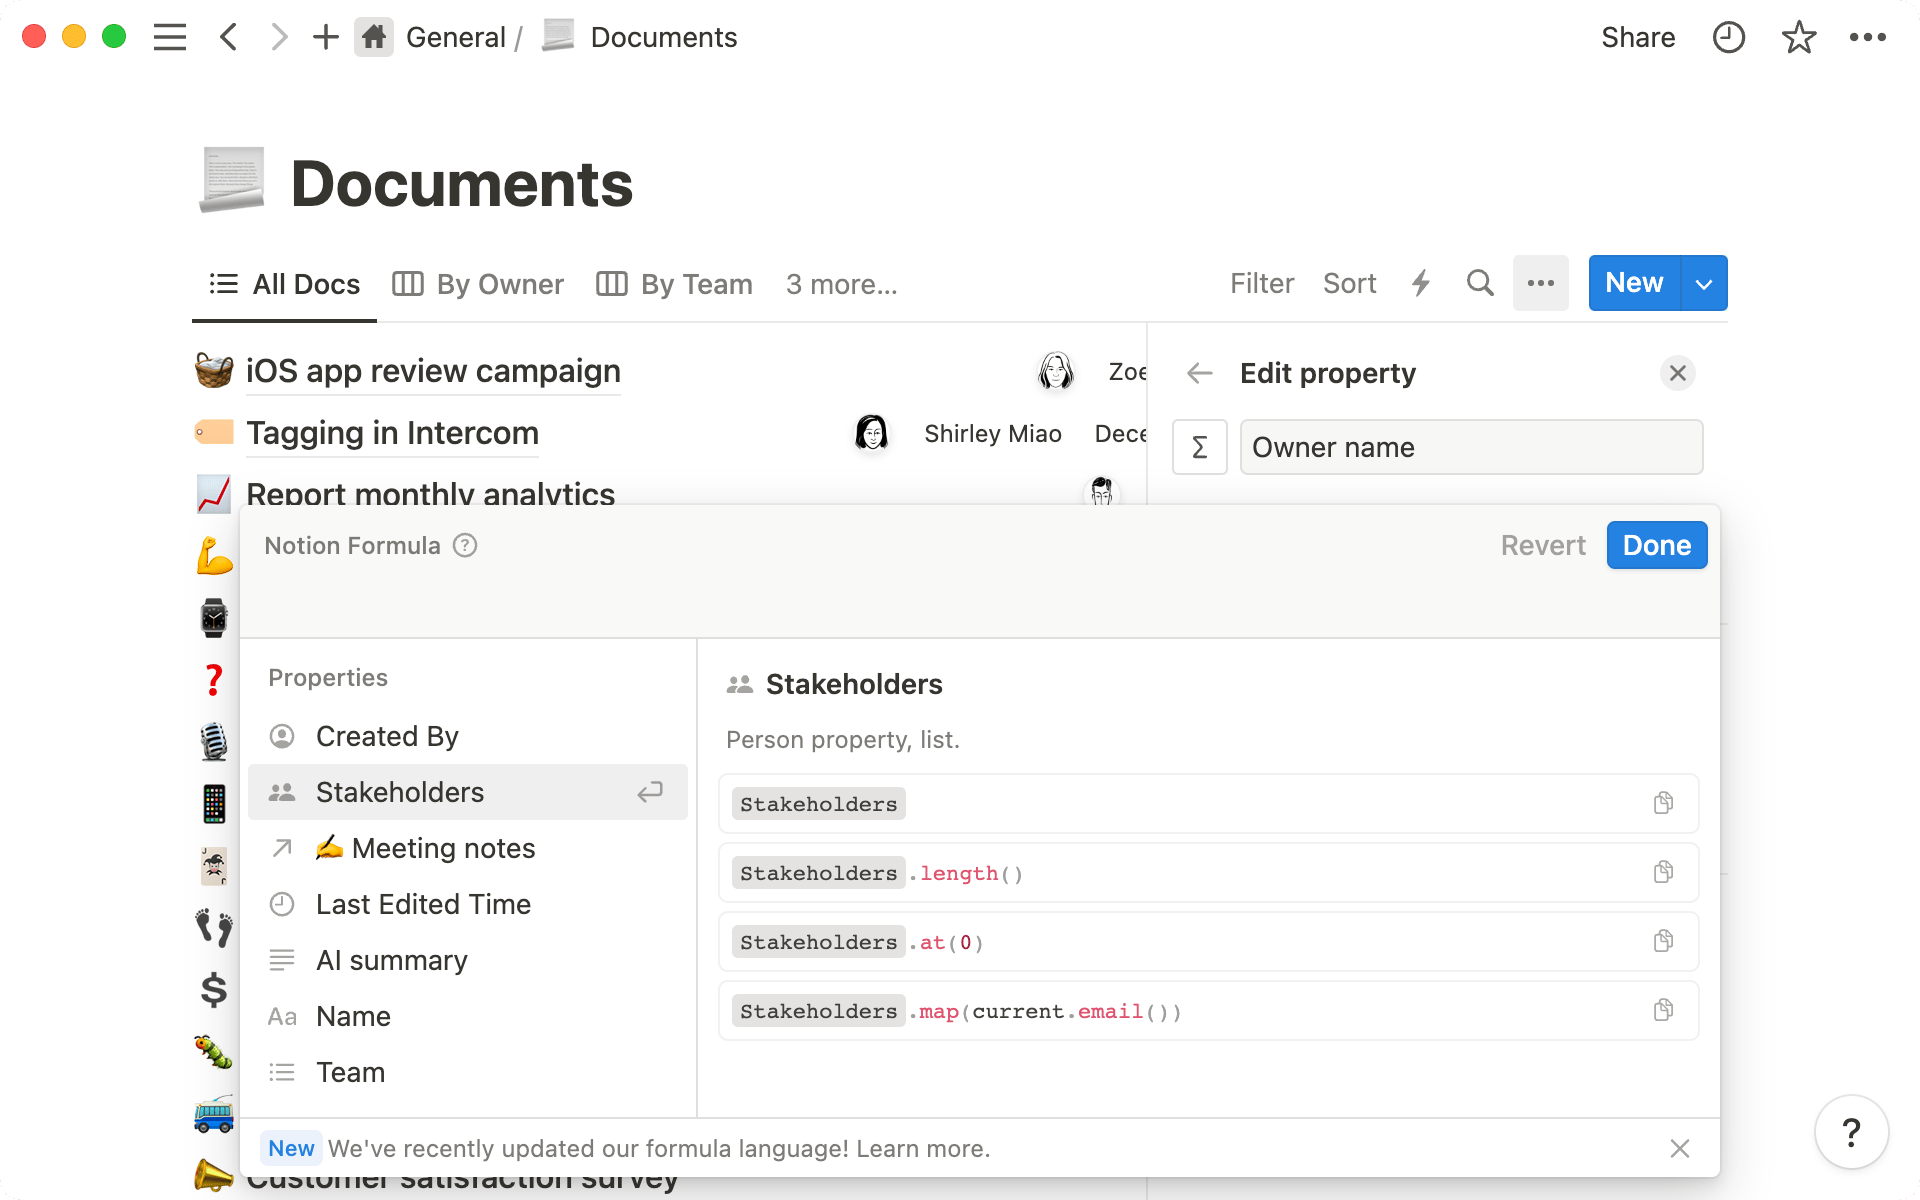
You can access more information directly — formulas are now smarter, so they can reach into properties of related databases, as well as access information like member’s emails and names.

New formula language
What that means for you
Update formulas to get rich data outputs
Previously, formulas flattened a bunch of different data types into text. With new formulas, you can now get richer data type outputs.
Since we know that people rely on formula outputs looking and behaving a certain way, to preserve output compatibility, all existing formulas that reference rollup, person, file, and multi-select properties were converted to text.
For example, where you previously had prop("Person") returning people’s names as text, you’ll now see prop("Person").map(current.format()).join(", "). This is because with formulas 2.0, prop("Person") will now return a list of people instead of just a comma-separated text-value. With the migration, we preserve your original output by converting each item each item in the “person” list to text values, separated by commas.
If you want to use the rich data type improvements, you’ll need to remove the conversion language. In the example above, that means just using prop("Person") directly. In this case, your output will now return a list of people type objects instead of plain text.
Dynamic property mentions
Call workspace level information from properties
You can now access workspace-level information like the names and emails of people tagged in your database, or a related database, without having to create these as their own property.
For example, you can retrieve data such as the user's full name and email using the "Created By" property and then referencing “name” as prop("Created By").name() or "email" as prop("Created By").email().
This lets you streamline properties on your larger databases, and still retrieve the necessary information without having to go through multiple steps.
Dot notation now supported
Create your own variables with let
Formulas now support local variable creation. Just like with traditional Javascript, let creates a variable using the name of the first argument and the value of the second argument. The third argument is where you write the rest of your formula, using your newly created variable.
For example, if you’re writing a formula that references total cost, where cost is the sum of a few properties, you may not want to sum together those properties multiple times while writing your formula.
Instead, consider creating a variable with let(SalesTax, (prop("Subtotal")*0.099), prop("Subtotal") + SalesTax). Then, every time you type SalesTax you’ll be able to use the predefined value of subtotal times the tax rate.
When should I use a variable?
Once you’ve gotten the hang of working with let, you can also use lets for many variable assignments at once!
For example, you could combine two variables with lets(a, "Hello", b, "world", a + " " + b).
Reference properties in related databases (without rollups!)
You can now pinpoint the exact information you need in a related database, without having to first create a rollup to reference that property. Combined with formula’s ability to edit and change the way that information is displayed — this becomes far more powerful than a regular rollup.
For example, if you have a database of Projects related to a database of Tasks, you may be interested in showing whether the tasks are "✅ Complete", "⚠️ In progress", or "❌ Not started" based on the % of completed tasks.
Previously, you would’ve had to create a rollup to show task completion, and then create a formula that acts on that information to return "✅ Complete", "⚠️ In progress", or "❌ Not started".
With new formulas, you can combine these actions and define your “rollup value” as a variable.
First, get the number of completed tasks using the
map(),filter(), andlength()functions.
prop("Tasks").map(current.prop("Status")).filter(current == "Done").length()
2. Then, define the rollup value in a variable called percentComplete — to do this divide the number of completed tasks, total task, then multiplying by 100 — and voila! You can now apply functions to your new value.
let(
  percentComplete,
	prop("Tasks").map(current.prop("Status")).filter(current == "Done").length()
	/ prop("Tasks").map(current.prop("Status")).length() * 100),
/* write the rest of your formula here */
)
In this specific example, your final formula could look something like this.
let(percentComplete, round(prop("Tasks").map(current.prop("Status")).filter(current =="Done").length()/ prop("Tasks").map(current.prop("Status")).length() * 100),
  ifs(percentComplete == 100, "✅ All tasks complete", percentComplete > 0, "⚠️ In progress (" + percentComplete + ")%","❌ Not started"))
Explore all changes to existing functionality
Use the toggles below to explore changes to specific functions and note that your existing formulas will have been converted automatically.
Property referencing changes
Math functions changes
Date function changes
Text function changes
Checkbox (boolean) function changes
And of course, there’s several new functions, like match(), style(), and more! Check out the full list here.


.png)
Something we didn't cover?