SAML SSO configuration
Notion provides Single Sign-On (SSO) functionality for Business and Enterprise customers to access the app through a single authentication source. This allows IT administrators to better manage team access and keeps information more secure 🔐
Jump to FAQsNotion’s single sign-on (SSO) services are built upon the SAML (Security Assertion Markup Language) 2.0 standard that permits identity managers to safely pass authorization credentials to service providers like Notion and connect your Identity Provider (IdP) and workspace(s) for an easier, more secure login experience.
SSO services permit a user to use one set of credentials (for example, a name or email address and password) to access multiple applications. The service authenticates the end user only once for all the applications the user has been given rights to and eliminates further prompts when the user switches applications during the same session.

Note: SAML SSO is available for workspaces on Notion's Business or Enterprise Plans. Contact sales to learn more →
Benefits of SSO
Streamlines user management across systems for workspace owners.
Removes the need for end-users to remember and manage multiple passwords. Simplifies end-users experience by allowing them to sign in at one single access point and enjoy a seamless experience across multiple applications.
Note: Only members can access a workspace via SSO. Guests are not supported.
Prerequisites for SSO with Notion
Your workspace must be on a Business Plan or Enterprise Plan.
Your Identity Provider (IdP) must support the SAML 2.0 standard.
Only a workspace owner can configure SAML SSO for a Notion workspace.
At least one domain has been verified by a Workspace owner.
Enable SAML SSO for a single workspace
Go to Settings & members, then select the Settings tab.
In the Allow Email Domain section, remove all email domains.
Then select the Identity & Provisioning tab.
Verify one or more domains. See instructions for domain verification here →
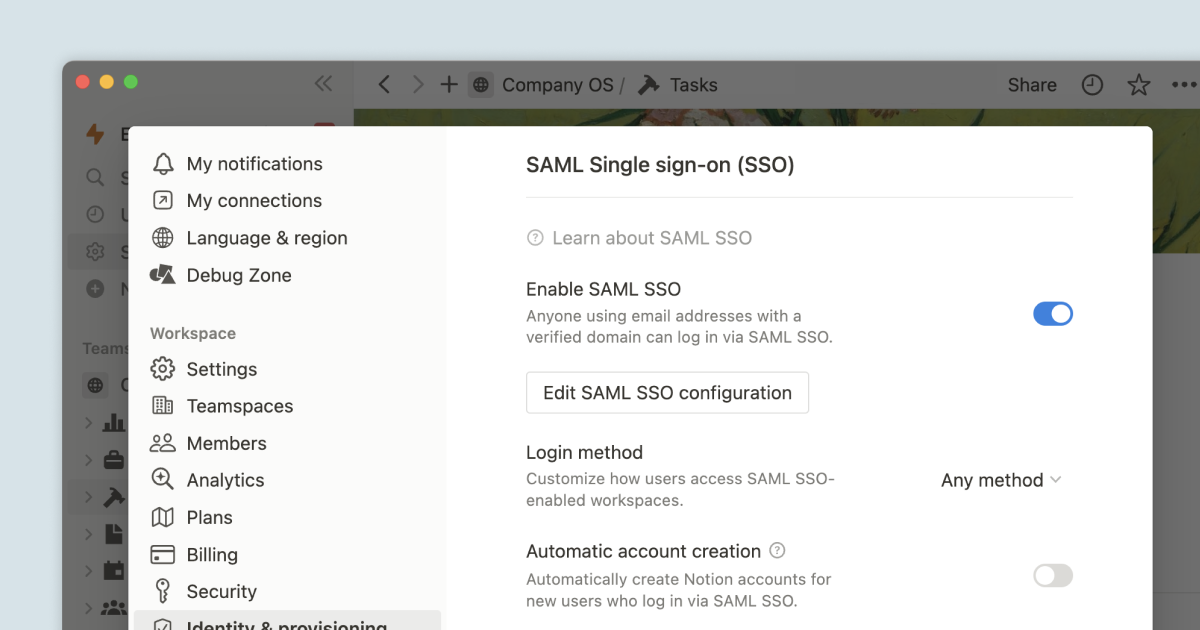
Toggle on Enable SAML SSO and the SAML SSO Configuration modal will automatically appear and prompt you to complete the set-up.
The SAML SSO Configuration modal is divided into two parts:
The Assertion Consumer Service (ACS) URL is to be entered in your Identity Provider (IdP) portal
The Identity Provider Details is a field in which either an IdP URL or IdP metadata XML must be provided to Notion.
For more information on where to enter and obtain this information, please refer to our IdP-specific guides below.

Note: Guests are not supported with SAML SSO on Notion.
From the workspace where you have verified your domain and enabled SAML SSO, there is a Linked Workspaces section listing all of the workspaces associated with your SAML SSO configuration.
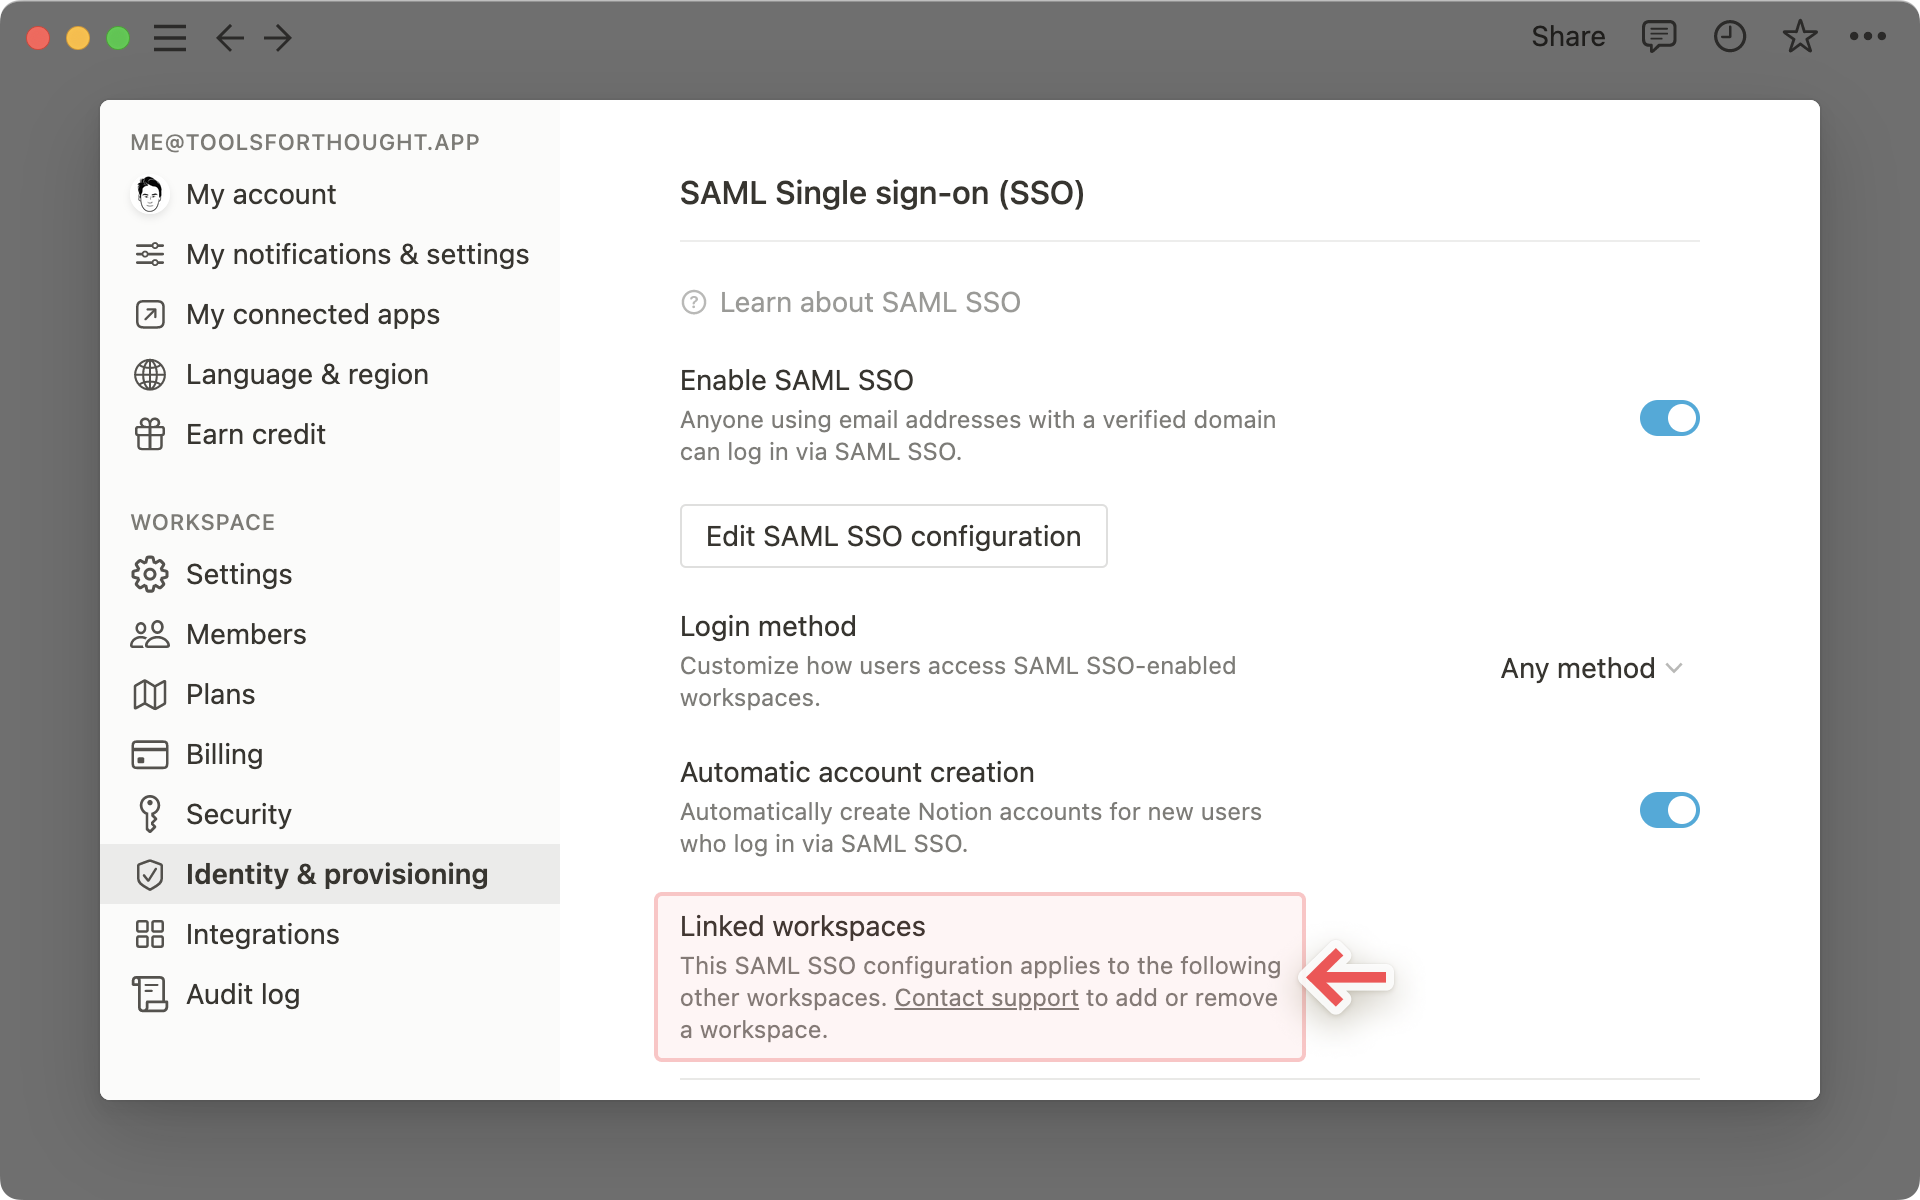
Users with a verified email address who have access to the primary workspace or one of the linked workspaces will be able to log in via SAML SSO.
Sales-assisted Enterprise customers can add Enterprise workspaces to their SAML SSO configuration or remove them by reaching out to team@makenotion.com.
Enforce SAML SSO
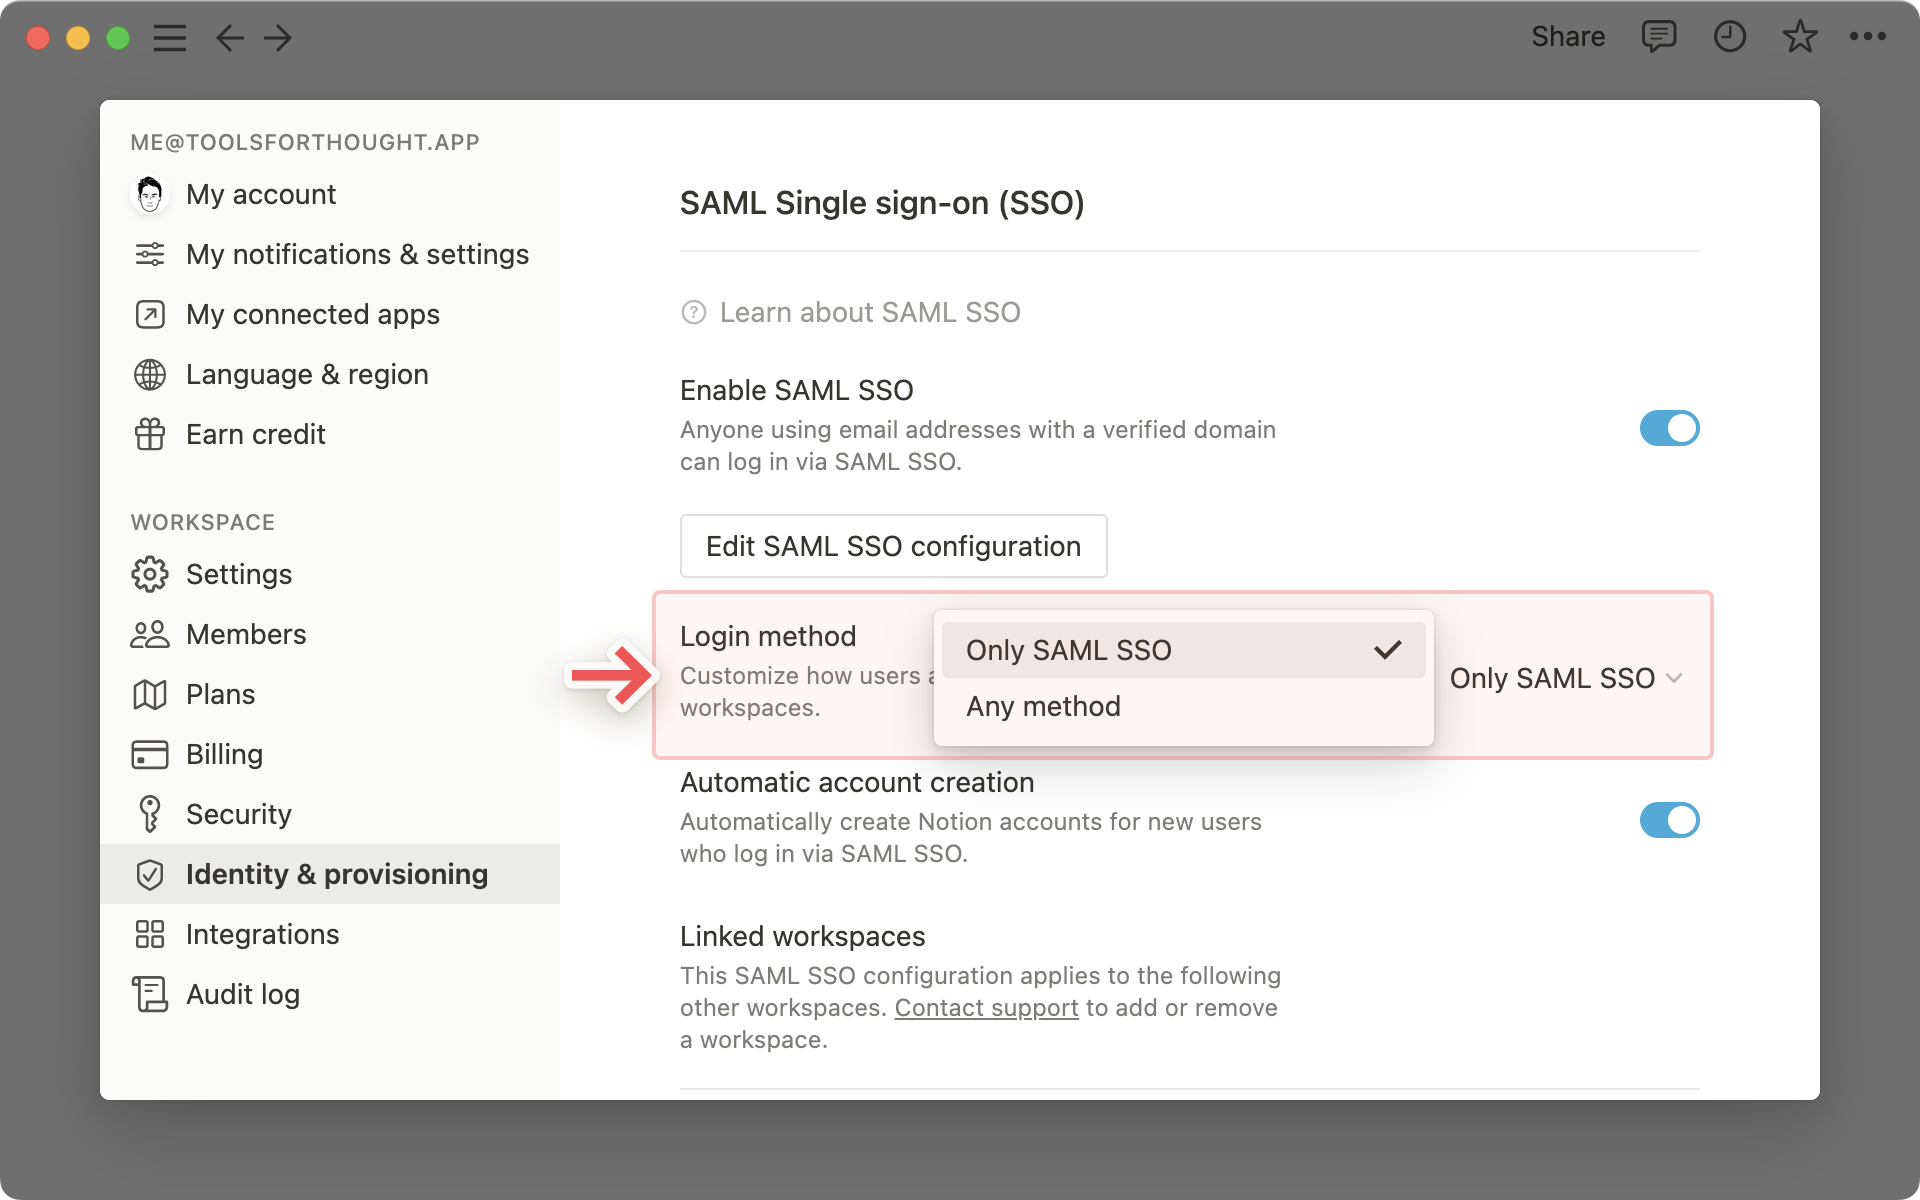
Once you have completed your configuration of SAML SSO for a single workspace, users will be able to log in via SAML SSO in addition to other log-in methods such as username/password and Google Authentication.
To ensure users can only log in using SAML SSO and no other method, update the Login method to
Only SAML SSO.
SAML SSO will only be enforced for users with your verified domain and who have access to the primary workspace or a linked workspace.
Guests invited to pages in a Notion workspace cannot use SAML SSO to login; therefore they will always use their e-mail/password or the “continue with Google/Apple” options to login.
Workspace owners will always have the option to bypass SAML SSO by using their email and password credentials. This is to allow them to access Notion in the event of IdP/SAML failure. They will be able to log in and disable or update their configuration.
Notion supports Just-in-Time provisioning when using SAML SSO. This allows someone signing in via SAML SSO to join the workspace automatically as a member.
To enable Just-in-Time provisioning:
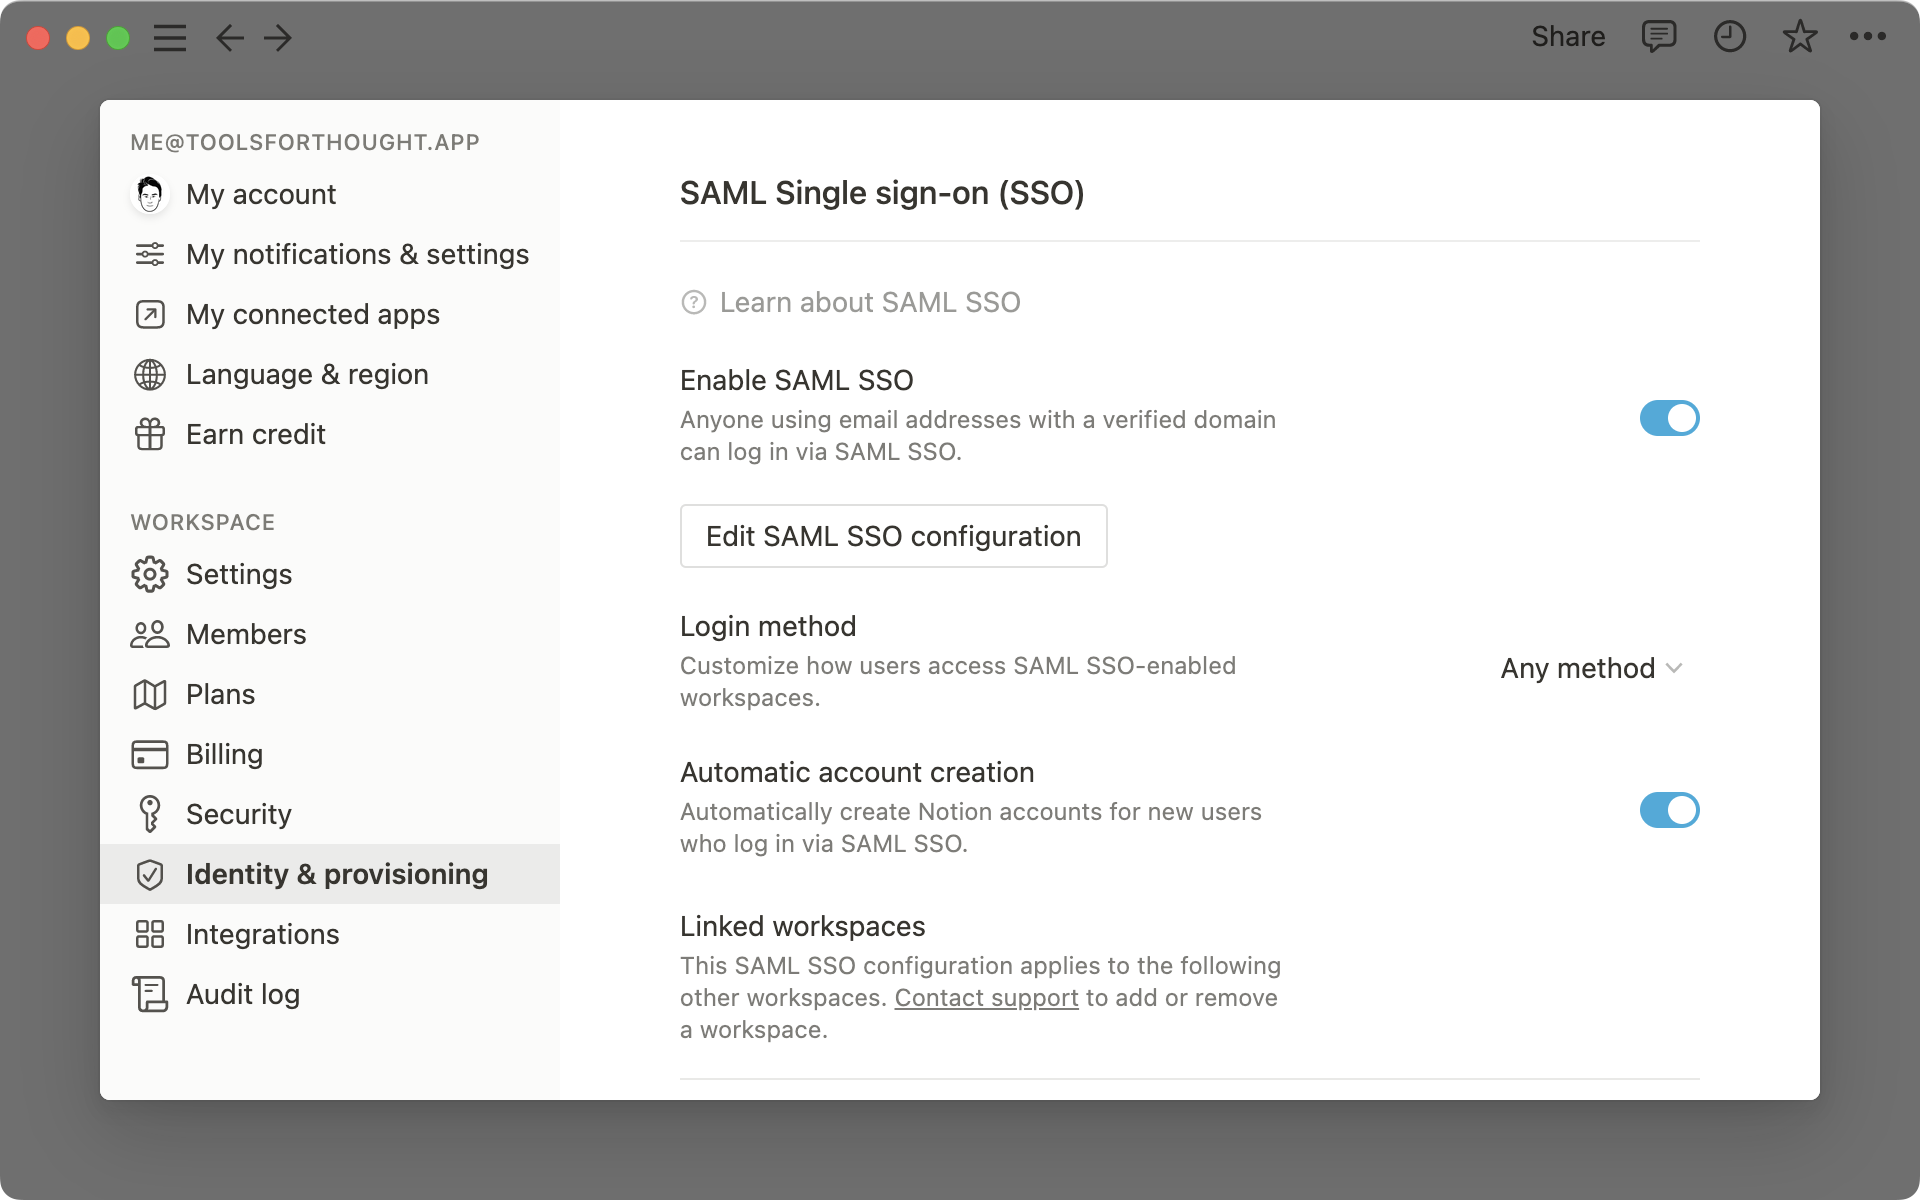
In Settings & members -> Identity & provisioning, make sure that Automatic account creation is enabled.
Note: We don’t recommend enabling Just-in Time provisioning if you are using SCIM. Having an “allowed email domain” in place allows users on that domain to join the workspace so there could be a mismatch between membership in their Identity Providers and Notion.
These are instructions for setting up Notion SAML SSO with Entra ID (formerly Azure), Google, Okta, and OneLogin. If you use a different Identity Provider and need assistance with configuration, please contact our support team.
Entra ID
For additional documentation, you can also reference steps on Entra ID's website here:
Step 1: Create a new application integration
Sign in to the Entra ID portal. On the left navigation pane, select the Azure Active Directory service.
Navigate to Enterprise Applications and then select All Applications.
To add a new application, select New application.
In the Add from the gallery section, type Notion in the search box. Select Notion from results panel and then add the app. Wait a few seconds while the app is added to your tenant.
Step 2: Create SAML Integration
In the Azure portal, on the Notion application integration page, find the Manage section and select single sign-on.
On the Select a single sign-on method page, select SAML.
Step 3: SAML Settings
In Notion, go to the Settings & members tab, then select the Settings tab
In the Allow Email Domain section, remove all email domains.
Then select the Identity & Provisioning tab.
Verify one or more domains. See instructions for domain verification here →
Toggle on Enable SAML SSO and the SAML SSO Configuration modal will automatically appear and prompt you to complete the set-up.
The SAML SSO Configuration modal is divided into two parts — one section is the Assertion Consumer Service (ACS) URL to be entered in your Identity Provider (IdP) portal and the second section is Identity Provider Details in which either IdP url or IdP metadata XML that must be provided to Notion.
Step 4: Configure Notion app in Entra ID
On the Set up single sign-on with SAML page, click the pencil icon for Basic SAML Configuration to edit the settings.
On the Basic SAML Configuration section, if you wish to configure the application in IdP initiated mode, enter the values for the following fields:
In the Identifier (Entity ID) text box, enter the following URL:
https://www.notion.so/sso/samlIn the Reply URL (Assertion Consumer Service URL) text box, use the ACS URL from Notion, found on the Identity & Provisioning tab of Settings & members in your left-hand sidebar
In the Sign on URL text box, enter the following URL:
https://www.notion.so/login
In the User Attributes & Claims section, ensure the required claim are set to
Unique User Identifier (Name ID): user.userprincipalname [nameid-format:emailAddress]
firstName: user.givenname
lastName: user.surname
email: user.mail
On the Set up single sign-on with SAML page, in the SAML Signing Certificate section, click the copy button next to the App Federation Metadata Url.
Go to your Notion workspace Settings & members > Identity & Provisioning, and paste the App Federation Metadata Url value you copied into the IdP metadata URL field text box. Make sure the radio button Identity Provider URL is selected
Step 5: Assign users to Notion
In the Azure portal, select Enterprise Applications, and then select All applications. In the applications list, select Notion.
In the app's overview page, find the Manage section and select Users and groups.
Select Add user, then select Users and groups in the Add Assignment dialog.
In the Users and groups dialog, select from the Users list, then click the Select button at the bottom of the screen.
If you are expecting a role to be assigned to the users, you can select it from the Select a role dropdown. If no role has been set up for this app, you see "Default Access" role selected.
In the Add Assignment dialog, click the Assign button.
For additional instructions, you can also reference the documentation in the Google Workspace Admin Help Center:
Step 1: Get Google identity provider (IdP) information
Make sure you're signed into an administrator account to ensure your user account has the appropriate permissions
In the Admin console, go to
Menu->Apps->Web and mobile appsEnter Notion in the search field and select the Notion SAML app
On the
Google Identity Providerdetails page, download the IdP metadata fileOpen the file,
GoogleIDPMetadata.xmlin a compatible editor, then select and copy the contents of the fileLeave the Admin console open, you'll continue with the configuration wizard after performing the next step in the Notion application
Step 2: Set up Notion as SAML 2.0 service provider
In Notion, go to the
Settings and memberstab, then select theSettingstabIn the
Allowed Email Domainsection, remove all email domainsSelect the
Identity & ProvisioningtabAdd a new domain and verify it. This should be the same as your Google Workspace domain
In
SAML Single sign-on (SSO)settings, toggle theEnable SAML SSOon. This opens theSAML SSO ConfigurationdialogIn the dialog, do the following:
Under
Identity Provider Details, selectIDP metadata XMLPaste the contents of the GoogleIDPMetadata.xml file, (copied in step 1 above) into the IdP metadata XML text box
Copy and save the Assertion Consumer Service (ACS) URL. You'll need this when you complete the Google-side configuration in Admin console in step 3 below
Click
Save Changes
Ensure that the remaining options Login method, Automatic account creation and Linked workspaces contain the desired values for your configuration
Step 3: Finish SSO configuration in Admin Console
Return to the Admin console browser tab
On the
Google Identity Provider detailspage, clickContinueOn the
Service provider detailspage, replace the ACS URL with the ACS URL you copied from Notion in Step 2 aboveClick
ContinueOn the
Attribute Mappingpage, click theSelect fieldmenu and map the following Google directory attributes to their corresponding Notion attributes. Note that firstName, lastName, and email are required attributesNote: The profilePhoto attribute can be used to add a user photo in Notion. To use it, create a custom attribute and populate it in the user profile with the URL path to the photo, then map the custom attribute to profilePhoto.
Optional: Click
Add Mappingto add any additional mappings you needClick
Finish
Note: Regardless of how many group names you enter, the SAML response will only include groups that a user is a member of (directly or indirectly). For more information, see About group membership mapping.
Step 4: Enable the Notion app
In the Admin console, go to Menu > Apps > Web and mobile apps.
Select Notion.
Click User access.
To turn a service on or off for everyone in your organization, click On for everyone or Off for everyone, and then click Save.
(Optional) To turn a service on or off for an organizational unit:
At the left, select the organizational unit.
To change the Service status, select
OnorOff.Choose one: If the Service status is set to
Inheritedand you want to keep the updated setting, even if the parent setting changes, clickOverride. If the Service status is set toOverridden, either clickInheritto revert to the same setting as its parent, or clickSaveto keep the new setting, even if the parent setting changes. Note: Learn more about organizational structure.
Optional: Turn on the service for a group of users. Use access groups to turn on a service for specific users within or across your organizational units. Learn more.
Ensure that your Notion user account email IDs match those in your Google domain.
Okta
For additional documentation, you can also reference steps on Okta's website here:
Step 1: Add the Notion app from Okta's application directory
Log in to Okta as an administrator, and go to the Okta Admin console.
Go to the Application tab, select Browse App Catalog and search for "Notion" in the Okta app catalog.
Select the Notion app and click Add integration.
In the General Settings view, review the settings and click Next.
In the Sign-on Options view, select the SAML 2.0 option.
Above the Advanced Sign-on Settings section, click on the Identity Provider metadata. This will open a new browser tab. Copy the link of the URL.
Step 2: Configure SAML settings in Notion
In Notion, go to the Settings & members tab, then select the Settings tab
In the Allow Email Domain section, remove all email domains.
Then select the Identity & Provisioning tab.
Verify one or more domains. See instructions for domain verification here →
Toggle on Enable SAML SSO and the SAML SSO Configuration modal will automatically appear and prompt you to complete the set-up.
The SAML SSO Configuration modal is divided into two parts — one section is the Assertion Consumer Service (ACS) URL to be entered in your Identity Provider (IdP) portal and the second section is Identity Provider Details in which either IdP url or IdP metadata XML that must be provided to Notion.
Choose the Identity Provider URL, and paste the Identity Provider metadata URL you copied in Step 1. Click Save changes.
In the Identity & Provisioning tab, scroll down and copy the Workspace ID identifier
In Okta Admin console > Advanced Sign-on Settings section, paste the Workspace ID in the Organization ID text box
In Credentials details, select Email from Application username format dropdown, and click Done.
Step 3: Assign users and groups to Notion
In Okta > Assignments tab, you can now assign users and groups to Notion.
OneLogin
For additional documentation, you can also reference steps on OneLogin’s website here:
Note: If you’re planning to configure provisioning with SCIM, please do that before you configure SAML SSO. Instructions for configuring SCIM provisioning with OneLogin →
Step 1: Create new application integration
If you have not already configured provisioning, go to Administration → Applications → Applications, then click the Add App button, search for Notion in the search box, and select the SAML 2.0 version of Notion.
Click Save.
Step 2: Create SAML integration
Otherwise, navigate to Applications → Applications and select the Notion app connector you already added
Navigate to the SSO tab and copy the Issuer URL value. Paste it somewhere to be retrieved later.
Step 3: SAML settings
In Notion, go to the Settings & members tab, then select the Settings tab
In the Allow Email Domain section, remove all email domains.
Then select the Identity & Provisioning tab.
Verify one or more domains. See instructions for domain verification here → Verify a domain for your workspace
Toggle on Enable SAML SSO and the SAML SSO Configuration modal will automatically appear and prompt you to complete the set-up.
The SAML SSO Configuration modal is divided into two parts — one section is the Assertion Consumer Service (ACS) URL to be entered in your Identity Provider (IdP) portal and the second section is Identity Provider Details in which either IdP url or IdP metadata XML that must be provided to Notion.
Step 4: Configure Notion app in OneLogin
Copy Assertion Consumer Service (ACS) URL from Notion
Go back to the OneLogin Administration UI
Navigate to the Configuration tab of the Notion app connector your just added to your OneLogin account
Paste the Assertion Consumer Service (ACS) URL from Notion into the Consumer URL textbox
Click Save
Go back to the Notion Edit SAML SSO configuration settings
Paste the Issuer URL you copied from the SSO tab in OneLogin URL into the Identity Provider URL textbox. Make sure the radio button Identity Provider URL is selected
Rippling
For detailed documentation, you can reference Rippling's website here →
Custom SAML SSO configuration
If you don't use one of Notion’s supported SAML providers, you can also configure your IdP to use SAML with Notion.
Step 1: Set up your IdP
Your IdP must support the SAML 2.0 spec to be used with Notion.
Configure the ACS URL to the value Assertion Consumer Service (ACS) URL from Notion. You can find this in
Settings→Identity & Provisioning→Edit SAML SSO Configuration.Configure
NameIDtourn:oasis:names:tc:SAML:1.1:nameid-format:emailAddress.Similarly, configure
usernametourn:oasis:names:tc:SAML:1.1:nameid-format:emailAddress.
Configure
EntityIDto https://notion.so/sso/saml. You can find this inSettings→ the bottom ofIdentity & Provisioning.Configure the following attributes:
emailAddress: This is a user's email address. Most IdPs set this by default.(Optional)
firstName(Optional)
lastName(Optional)
profilePicture
Copy the IdP metadata URL or IdP metadata XML for next steps.
Step 2: Set up SAML in Notion
In Notion, open
Settings→Identity & Provisioning.Add new email domains and follow the prompts to verify them. These must be email domains of your users logging into Notion.
In
SAML Single sign-on (SSO)settings, toggleEnable SAML SSOon. This will open the SAML SSO Configuration dialog.Under
Identity Provider Details, input the IdP metadata URL or IdP metadata XML from your IdP.Make sure you provide your desired inputs for
Login method,Automatic account creation, andLinked workspaces.
Switching identity providers
To switch identity providers, go to Settings & members in your left sidebar → Identity & provisioning → Edit SAML SSO configuration. Enter your new information, then select Save changes.
When switching to a new IdP, we recommend that:
SSO not be enforced during the transition, so you can minimize the risk of locking users out.
Email addresses for the users under your new IdP match the user’s email in Notion.
Note: Changing identity providers does not end user sessions or deactivate users.
If you encounter errors when setting up SAML SSO, check to make sure your IdP's metadata, SAML requests and responses are valid XML against the SAML XSD schemas. You can do so using this online tool: https://www.samltool.com/validate_xml.php
Note that we do not support the EntitiesDescriptor element. If your IdP's metadata contains this element, extract the contained EntityDescriptor element and try again.
FAQs
Why is the current Enable SAML SSO greyed out?
Why is the current Enable SAML SSO greyed out?
The most common reason is that you have not yet verified ownership of a domain. If this is the case, you will notice that you either don’t have any domains listed in the verify email domain section or the domain is pending verification.
Why can’t I edit the SAML SSO settings?
Why can’t I edit the SAML SSO settings?
The most common reason is that you are trying to modify the verified domains or SSO configuration from a linked workspace which is a workspace that is already associated with another SSO configuration.
In linked workspaces, all domain management and SSO configuration settings are read-only. To modify the SSO configuration or remove this workspace from the SSO configuration, you must have access to the primary workspace. The name of the primary workspace can be found at the top of the Identity & Provisioning settings tab.
Why do I need to verify a domain to enable SSO?
Why do I need to verify a domain to enable SSO?
We ask that the email domain ownership is validated to ensure that only the owner of the domain can customize how their users log into Notion.
Having trouble setting up SSO? Here are some common issues:
Having trouble setting up SSO? Here are some common issues:
Try using a URL instead of an XML.
We recommend testing the setup process with a test account before enforcing it for users.
If neither of these options help, reach out to support at
Why should I remove email domains from the “Allowed Email Domains” setting before configuring SAML SSO for my workspace?
Why should I remove email domains from the “Allowed Email Domains” setting before configuring SAML SSO for my workspace?
The “Allowed Email Domain” setting allows users with the selected domains to access your workspace without being provisioned via your IdP. To ensure that only users provisioned via your IdP can access your SAML-enabled workspace, disable this feature by removing all email addresses from the “Allowed Email Domain” list.
Can I still log in to Notion if my identity provider is out of service?
Can I still log in to Notion if my identity provider is out of service?
Yes, even with SAML enforced, Workspace owners have the option to log in with email. Thereafter, a Workspace owner can change the SAML configuration to disable Enforce SAML so users may log in with email again.
Are profile photos transmitted to Notion from the IdP?
Are profile photos transmitted to Notion from the IdP?
Yes, profilePhoto is an optional custom attribute. You may assign this attribute to a corresponding attribute in your IdP, provided the attribute contains the URL to an image. If the profilePhoto field is set, this image will replace the avatar in Notion when the user signs in using SAML SSO.
How do I allow admins of other workspaces in my SAML configuration create new workspaces?
How do I allow admins of other workspaces in my SAML configuration create new workspaces?
Only the admins of your primary workspace will be able to create new workspaces using your verified domain(s). Please reach out to our support team (team@makenotion.com) to switch your primary SAML workspace to another linked workspace in your SAML configuration.